

1. Install Windows using WinNTSetup?
WinNT Setup supports installing many Windows versions including XP\7\8\10\11. You can install Windows according to UEFI or Legacy standards in any boot standard. Whether you are using 32-bit or 64-bit WinPE, it can be done.
For Windows Rebuild versions that cannot be installed using Setup.exe, WinNT Setup will solve this problem
* The hard drive standard for Windows boot UEFI mode is GPT:
GPT (GUID Partition Table) is a new standard that can replace MBR with more optimized interfaces and better features. The GPT standard is also compatible with UEFI to replace BIOS. The advantage of the GPT standard is that it supports a maximum capacity of 256TB and the number of partitions on the hard drive is up to 128.
*** Newer computers all default to GPT so you don’t need to worry about this ***
- Download AnhDV Boot latest version: DOWNLOAD
- Download NHV Boot latest version: DOWNLOAD
- Download Windows 11 Microsoft: https://microsoft.com/windows11
- Download Windows 10 Microsoft: https://microsoft.com/windows10
- Download Intel Rapid Storage Technology Driver (IRST): DOWNLOAD
Create Windows hard drive partition:
* Create Windows hard drive partition?
Step 1: On the main interface of AnhDV Boot, open the Partition Wizard 12 software.
Step 2: Right-click on the old EFI and Windows partition => Delete to delete the 2 specified partitions.
- Select the 2 partitions circled in Red below (Click to select each one and right-click, select Delete)
- Note that the Green Circle must be GPT (If it is MBR, right-click and choose to switch to GPT)

Step 3: Click Apply on the left side of the software to apply the changes to the partition.
Click Yes to continue.
After successfully deleting the partition, click OK to exit the dialog box.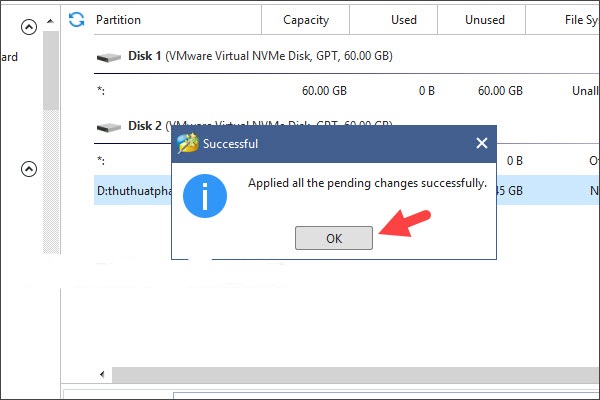
* Create EFI Boot partition
Step 1: Right-click on the newly deleted partition (Unallocated) (1) => Create (2).
Step 2: You set the parameters like the image below.
+ Drive Letter => None (1).
+ File System => FAT32 (2).
+ Partition Size => 100 – 500 *MB* (3).
Click OK (4) to create the partition.

Step 3: Right-click on the newly created partition (1) => Change Partition Type ID (2).
Step 4: Click on Please predefined ID from the list: (1) => select EFI System Partition (2) => Yes (3).
* Create a partition containing Windows
Step 1: Right-click on the Unallocated partition (1) => Create (2).

* Step 2: Leave the default parameters as shown => click OK.
- You can add the name you want for the C drive you want in the Partition Label section
- Set parameters as shown

Step 3: Click Apply on the left side of the software to apply the changes.
Click Yes to agree with the warning displayed on the screen.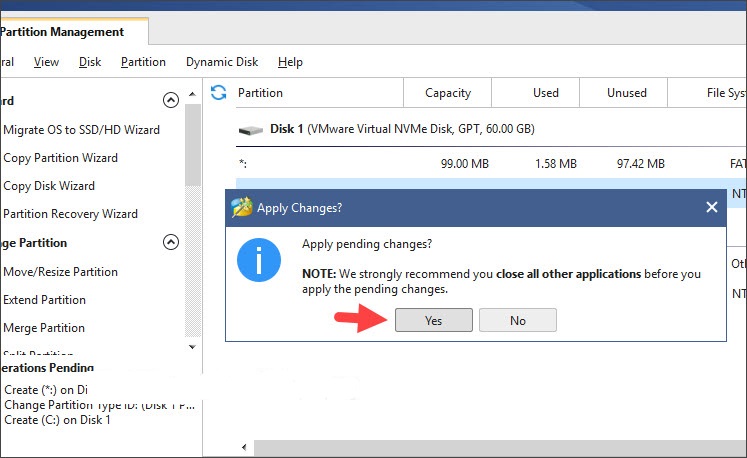
After partitioning is complete, click OK to ignore this message.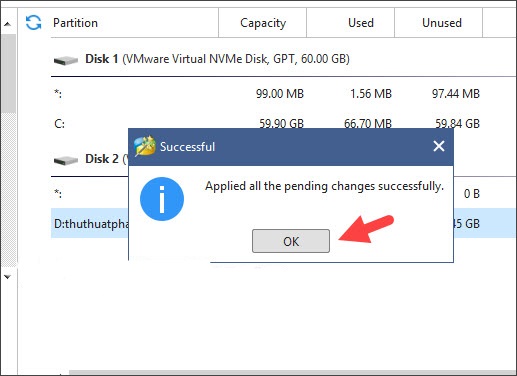
* Install Windows using WinNTSetup:
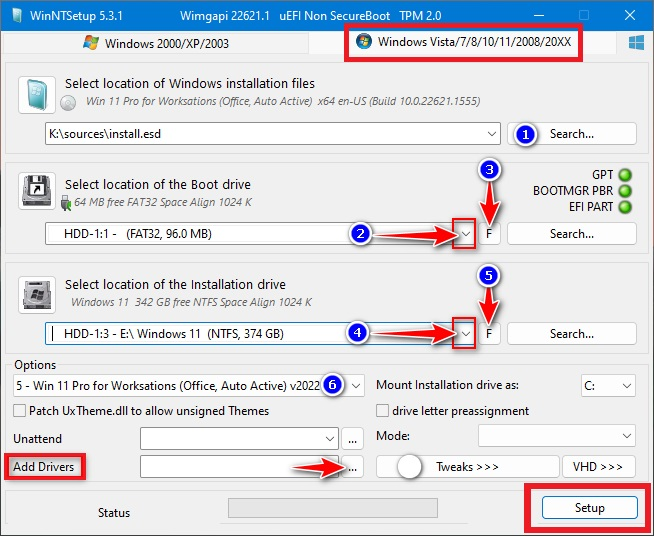
Step 1: Open WinNT Setup in the Windows Setup app (AnhDV Boot) on the Desktop
Step 2: Click on the tab Windows Vista/7/8/10/11 => ….
- Search (1): Select the downloaded Windows ISO
- Arrow (2): Select drive 100-500 *MB*
- Arrow (4): Select drive C
- The letter F is the drive format (You don’t need to press it because I just deleted and created a new one)
- (6) Select the Windows Version you want
- Add Drivers (For Intel generation 11+ PCs using RAID hard drives – Driver Download
- Link at the top of the article)
- Click Setup to continue to the next step
A new dialog box appears, click OK to continue.
Step 3: After successful installation, click Reboot to restart the computer.
During the process of booting Windows for the first time, to the Unlock your Microsoft experience step, you need to log in with a Microsoft account
To skip the step of signing in to a Microsoft account when setting up Windows, use one of the following accounts:
– no@thankyou.com, password: “any password”
– test@test.com, password: “test”
– 1@1.com, password: “test”
Or if you install Windows other than the Home or Pro version, it will force you to log in to a Microsoft account belonging to School or Work, so you can click on Domain to skip it.
Complete the Windows installation
2. Active Windows, Office & IDM
On Windows 10/11, right click on the Windows icon and select PowerShell or Terminal (Not Admin).
Copy >> Paste the code below and press Enter.
With Windows & Office enter the following command:
Press key 2 then >> Press key 1 to Activate Office
With IDM enter the following command:
irm https://massgrave.dev/ias | iex
Press key 1 to Activate IDM
That is all.
[…] Instructions for Installing Windows using WinNTSetup, Active Win […]